PLC Programming HandbooksPopular ArticlesNavigationUser login |
RSLogix 5000 Add-On Instructionsby John Schop One of the most powerful newer features of the RSLogix 5000 program is the ability to create Add-On Instructions. This allows a programmer to define an instruction that contains a commonly used function or algorithm (as a set of instructions), and use it as one instruction. To illustrate how this works, I am going to create an instruction that operates a cylinder, and because I’m making an add-on instruction, I can use that same instruction to control any number of cylinders in my application Assuming that these cylinders have two solenoids (one for ‘in’, one for ‘out’), and two proximity switches (one for…ah well, you get the picture), I want to create an add-on instruction that has the common logic in it, so I can just execute that instruction for each cylinder. After all, whatever the cylinders size or function is in the machine, every cylinder basically has the same properties and commands. Let’s start with creating a new add-on instruction:
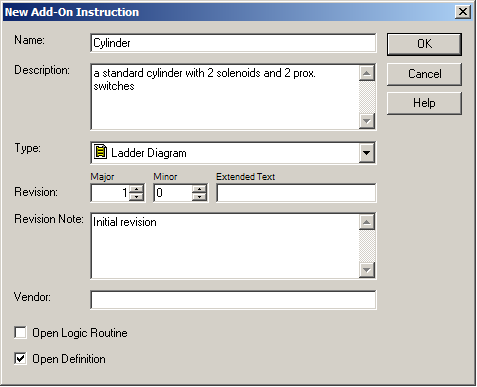
Right click on the Add-On Instructions folder in the controller organizer, and click ‘New Add-On Instruction’. In the screen that pops up, you can dream up a name for your instruction, add a description, choose a revision number, and add some notes:
As you can see, I kept the checkbox for ‘Open Definition’ checked, which means that in the next step I’ll be working on the definition of my cylinder. Click OK, and you will get the ‘Instruction Definition’ window:
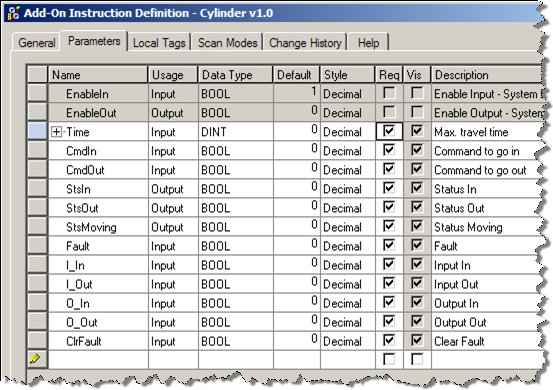
If you go to the ‘Parameters’ tab, you can define the parameters your instruction will use to do its magic. As you can see in the screenshot below, I’ve defined my parameters. Don’t panic if you don’t know exactly which parameters you’re going to need for your add-on, you can still change everything later. The EnableIn and EnableOut are two parameters that every instruction has, and are automatically created for you. I added command bits, status bits, a fault bit, a maximum travel time, a clear fault bit, and the I/O my cylinder is going to have. For each parameter, you’ll have to choose if it is an input for the instruction or an output, or maybe even an in and output. Also, you can identify here if the parameter is required, and if it is visible. I decided that all my parameters are going to be required, which automatically also makes them visible:
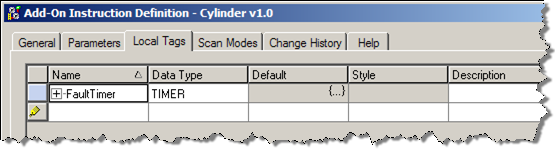
On the ‘Local Tags’ tab, I included a timer, which I will use to time the moves of the cylinder:
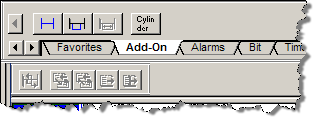
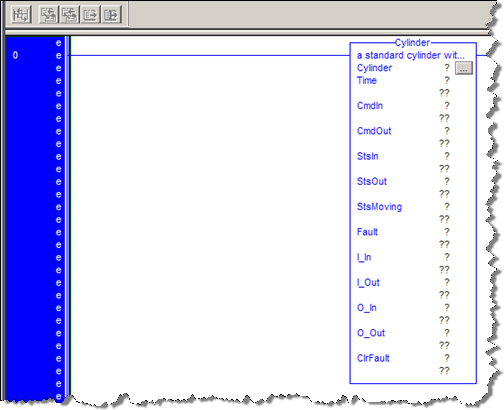
Let’s not worry about the other tabs at this point, we have enough to create our instruction. It’s time to use our add-on instruction! When I want to use my instruction, I simply go to the rung where I want it, then look up my new instruction in the ‘Language element’ tool bar (or you could press Alt-Insert on the keyboard):
(If you hover your mouse over the button where it says ‘Cylinder’, you will get a preview of what the instruction is going to look like). I click the button, and voila, there’s my instruction:
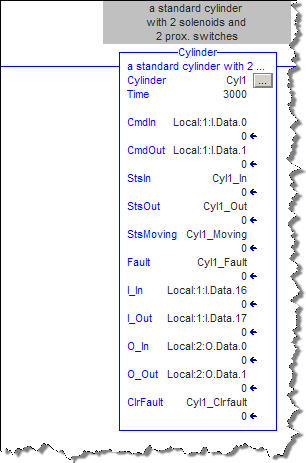
Now I only need to add some data to the parameters:
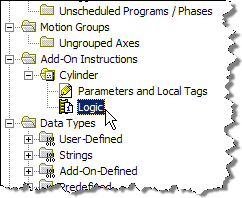
In this example, I’ve added inputs from an input card (Local:1) for the commands (pushbuttons or something like that), and of course for the I/O from the cylinder. The rest are just tags I created, and for ‘Time’ I entered a value of 3000 (milliseconds). Pay attention to the tag at the very top, called ‘Cyl1’. This is a tag of the type ‘Cylinder’. The data type was created automagically when we created the instruction, but you need to define one tag of that type for every instance, so the program can store data in there. (For you Siemens addicts, it’s like an Instance DB). Now that we have all our parameters wired up, we need to do something with them. Our add-on instruction needs some logic! In the controller organizer, find your add-on instruction, and then open up the editor by double clicking on ‘Logic’.
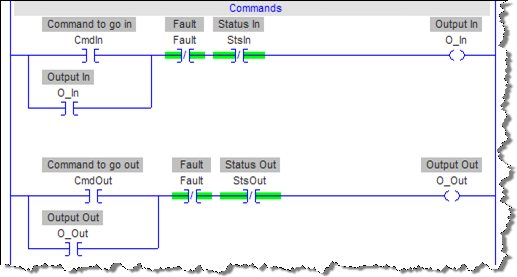
The next part of this article is of course just my interpretation of what a cylinder should do; you can of course use your own interpretation to create whatever functionality you want here. Let‘s look at my first two rungs:
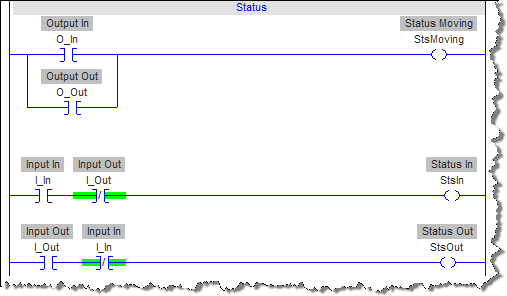
Here you see that if there is a command to go in (which we hooked up to the CmdIn parameter) then I turn on the output to move the cylinder in (O_In) and keep it energized, unless there is a fault, or the cylinder is in (StsIn). The same goes for moving out of course, in the second rung. The next three rungs make the status bits:
If either one of the outputs is on, the cylinder is moving (StsMoving), and when the input for cylinder in or cylinder out is true (and the other one is NOT, which is a security I usually build in), the StsIn or StsOut parameters are set to true. Next, I‘m going to determine if I should trigger the Fault bit:
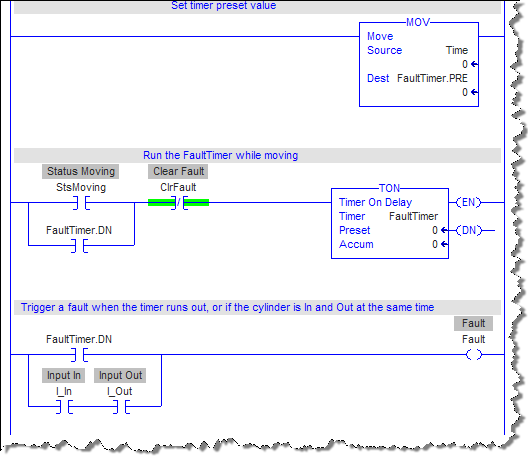
First I set the preset value of the timer to the value that was passed to my instruction in the ‘Time’ parameter. In the next rung, I let the StsMoving bit start that timer. Once the timer is done, it will keep itself energized until somebody resets the fault with the ClrFault parameter. Also, the fact that the timer is done (FaultTimer.DN), or the fact that the cylinder is in and out at the same time, triggers the ‘Fault’ bit that is used in the first couple of rungs to turn the commands off. That’s all the logic I wanted to show you. Use our imagination, and you can see a whole lot of fancy alarm and diagnostic bits, and maybe even a position sensor. A great benefit of this is, that once you’ve made a solid piece of code, you can re-use that add-on instruction in other projects as well, by exporting and importing the instruction, and even build a library of instructions for common parts of your applications. The sky is the limit here. You can think about pieces of equipment, like valves or motors, or even pieces of functionality, like for example recipe management, or complex calculations. And of course, as we all know, during the project, the required functionality will change. If you used add-on instructions, you’ll only have to change the logic once, to change the behavior of every piece of equipment that uses the instruction. ( categories: )
|


plc training
where can I get traind in PLC5/5000
try automationtraining.ca
try automationtraining.ca
plc training
Aslo try BIN95.com
training in rs logix 5000
training in rs logix 5000
rs logix 5000
how to get free download of this software???
rslogix5000
rslogix5000
rslogic training
I can also recommend automationtraining.ca . I know some people who went on Allen Bradley course and they said it was excellent
RSLogix 5000 Demo
Hello,
You can download the demo version of RSLogix 5000 from the following web page:
http://www.rockwellautomation.com/rockwellsoftware/design/rslogix5000/demo.html
Bye,
Fabio
PLC problems
Why won't the rslogix 5000 demo let me connect to a plc?
You'll have to pay for that
You'll have to pay for that privilege.
On line functionality
I really like these ad on instructions. It is a shame that none of it can be performed on line. Importing is an off line function untill ver 17 which has no support for redundancy. Most systems where I work do not have off line opportunities to perform downloads except once per year.Pity...
Contrologic V18 issues with CitectSCADA
Dear All Controllogic users:
Since the new upgrade of controllogic firmware, the structure of the Add on instruction has been changed from V17. However, it doesn't support the CitectSCADA. We test severl times, the communciation can be build for 2-3 mins, then it will drop. So downgrading of the controller is recommanded if you would like to use controllogic PLC and CitectSCADA at the same time.
Charlie Zha
Systems Engineer
mobile +61 (0)408408982 gotoSAGE.com
An unconditional MOV of the
An unconditional MOV of the 'Time' input parameter into the timer preset is a recipe for major fault.
why is it a recipe for a
why is it a recipe for a fault?